Terrain and Water Data
The Altus Mapping Engine is one of the most advanced cross-platform terrain visualization engines for large-scale world-wide terrain datasets. With Altus you can:
- Render terrain and water using a configurable color bar.
- Render terrain at varied resolutions in different regions.
- Use real-time, dynamic terrain coloring to call attention to areas based on altitude.
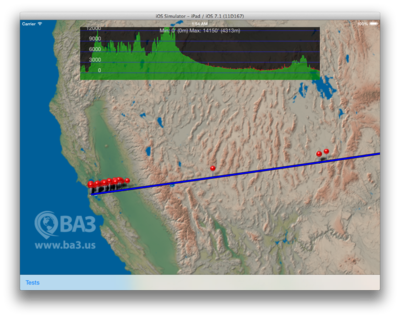
- Create terrain profiles (aka cross-sections) through a region, around a point, or along an arbitrary path.
You can use pre-packaged terrain and water datasets provided by BA3, a third party provider, or you can create your own. This document discusses how to create your own terrain data sets using AltusTerrain and GDAL tools.
Contents |
Fundamental Concepts
Dynamic Coloring
In Altus, terrain layers are treated as tile trees of varying levels where each tile is composed of a series of unsigned short values. Each value represents a height in meters above (or below) sea level. Data is dynamically color based on a height color bar. In this way you can render the terrain using a variety of styles at run-time.
Height and Water Encoding
The lowest point on earth is -424 M and the highest point is about 8850M. Water bodies may be present at any of these altitudes. Water will be encoded by negating the height and subtracting 1000. So any time Altus sees a height value that is less than -424 meters it assumes it is an encoded water height so it will add 1000 and negate it to get back to the original height (and will subsequently draw the area using the water color of the terrain color bar). All terrain tiles have a single-pixel border that is used at run-time for "stitching" terrain tiles together.
Height Sampling
A portion of the Altus SDK is dedicated to sampling height values from terrain data sets for rendering profile views. In some scenarios it is important that the 'maximum' height in an area is carried 'up' the sampling chain as levels of terrain are down-sampled. The AltusServer pipeline is aware of this requirement.
Creating Terrain Layers
If you desire to create your own data sets, you need to have
- A source of height data
- A source of water data
This document gives a few examples and a brief walkthrough of creating a usable terrain layer.
Input Height and Water Data
AltusTerrain can consume height data from a variety of sources including:
- NASA
- USGS
- Local municipalities or governments
The source data may in the following formats:
- Grayscale GeoTIFF
- HGT
- ESRI
- GDAL VRT
Any data format can be made to work if the data resolves to a 16-bit unsigned sample and the container format is in a projection that can be parsed with the GDAL library. Areas that are covered with water are represented by bitonal GeoTIFF imagery, or a collection of them represented by a VRT. AltusTerrain expects water data to be bitonal, in other words, black and white. Black pixels represent water, white pixels represent land.
This document will walk you through one way to create a low-resolution terrain data package for Altus using publicly available data sources.
Natural Earth Water Data
You can create a water data to go along with your terrain data using vector data from the Natural Earth project. Follow these steps:
- Visit this page and get relevant water shape files.
- Create a 'seed' image using this ImageMagick command:
convert -colorspace RGB \
    -depth 2 \
    -define png:color-type=2 \
    -size 10x10 \
    xc:white \
    seed.png
- Turn your seed image into a GeoTIFF using this GDAL command:
IMAGEWIDTH=108090
IMAGEHEIGHT=35429
gdal_translate -of GTiff \
    -b 1 \
    -a_ullr -180 90 180 -90 \
    -a_srs EPSG:4326 \
    -outsize $IMAGEWIDTH $IMAGEHEIGHT \
    -co "NBITS=1" \
    -co "COMPRESS=CCITTFAX4" \
    seed.png water.tif
- 'Burn' the water data into the GeoTIFF using this command:
gdal_rasterize -b 1 -burn 0 -l ne_10m_ocean ne_10m_ocean.shp water.tif
You can change the width and the height based on your needs and/or burn additional water shape files into the target image. The following script performs this operation using several 10m water shape sets from Natural Earth:
#!/bin/bash
# Copyright (c) 2014 BA3, LLC
# Demonstrates how to use ImageMagick, GDAL, and NaturalEarth data to create
# a bitonal water layer
set -u
set -e
#Use image size that matches 15 arc-second data
IMAGEWIDTH=86401
IMAGEHEIGHT=43201
OUTPUTFILENAME="water15.tif"
#Create a black and white seed image
convert -colorspace RGB \
    -depth 2 \
    -define png:color-type=2 \
    -size 10x10 \
    xc:white \
    seed.png
#Convert the see image to a world-wide geo-tif
gdal_translate -of GTiff \
    -b 1 \
    -a_ullr -180 90 180 -90 \
    -a_srs EPSG:4326 \
    -outsize $IMAGEWIDTH $IMAGEHEIGHT \
    -co "NBITS=1" \
    -co "COMPRESS=CCITTFAX4" \
    seed.png $OUTPUTFILENAME
function BurnWater {
    echo Burning $1
    gdal_rasterize -b 1 -burn 0 -l $1 $1/$1.shp $2
}
#Burn water data
BurnWater ne_10m_ocean $OUTPUTFILENAME
BurnWater ne_10m_lakes $OUTPUTFILENAME
BurnWater ne_10m_rivers_lake_centerlines $OUTPUTFILENAME
BurnWater ne_10m_lakes_europe $OUTPUTFILENAME
BurnWater ne_10m_lakes_north_america $OUTPUTFILENAME
BurnWater ne_10m_rivers_europe $OUTPUTFILENAME
BurnWater ne_10m_rivers_north_america $OUTPUTFILENAME
SRTM Water Body Data
Background information on SRTM Water body data is available here.
This data is a collection of shape files that define water around and through continents.
This data can be used to create input files for AltusTerrain such that it may add water area information to terrain data output. The data provided as a series of ESRI shape files which must first be rasterized.
Rasterizing SRTM Water Body Data
AltusTerrain has an option (-cwt option) that is specifically created for scanning and converting a directory of NASA's SWBD files into bitonal GeoTIFFs. This feature requires that you have ImageMagick and GDAL installed on your machine.
Here is an example of using that command:
AltusTerrain -cwt -if /MyFiles/NASA/SWBD/waterdata -of /MyFiles/water_tiffs -ts 1201
Here we are telling AltusTerrain to create a set of water tif files from the NASA SWBD shape files and use a resolution of 1201x1201 pixels for each image that covers a 1x1 degree area. This size is chosen because we will later use 3 arc-second SRTM height data which is also 1201x1201 samples per file.
This command tells AltusTerrain to do the following set of operations:
First it creates a 'seed' image using ImageMagick's convert commmand:
convert -colorspace RGB -depth 2 -define png:color-type=2 -size 10x10 xc:white seed.png
Next, it uses gdal_translate to create a bitonal, compressed, GeoTIFF image from the seed image using a command like this:
gdal_translate -of GTiff -b 1 -a_ullr -80 34 -79 33 -a_srs EPSG:4326 -outsize 1201 1201 -co "NBITS=1" -co "COMPRESS=CCITTFAX4" seed.png W098N95.tif
Then it determines all of the SWBD shape files that intersect this GeoTIFF and it rasterizes the vector data from each intersecting shape file into the GeoTIFF with a command like this:
gdal_rasterize -b 1 -burn 0 -l w080n33n w080n33n.shp W098N95.tif
It does this for every 1 degree by 1 degree section of the planet where SWBD shape files are found to intersect.
This will generate several thousand small bitonal GeoTIF images that we can then make into a GDAL vrt with these commands.
Generate a list of TIF files:
find /MyFiles/water_tiffs -type f | grep "\.tif" > water_tiff_files.txt
Create a GDAL virtual map from the file list:
gdalbuildvrt -input_file_list water_tiff_files.txt water_tiff.vrt
Now we have a relatively detailed set of water data we can use for burning water information into terrain data sets we create.
Roll Your Own Water Data
You are not required to use the method described here to create water information. If you have another data source, you simply need to convert it to either a GDAL VRT or GeoTIFF that can be used as input to AltusTerrain when it is generating terrain tiles and you need to make sure the data is in a format that is compatible. AltusTerrain will ignore any NODATA pixels, will consider non-black pixels to be terrain, and black pixels to be water. It will only look at the first raster band of a water data set and expect that band's data type to be GDT_Byte.
Height Data
Height value input data for AltusTerrain is expected to be a 2-byte short values. In GDAL terms, this would be a GDAL data set with 1 raster band whose data type is GDT_Int16.
You can create a data set that is compatible with AltusTerrain by getting the SRTM data form NASA and using the gdalbuildvrt program on whatever set of .HGT files you get.
Alternatively, you can use LIDAR data in ESRI format, or you can use some other format.
So long as heights can be read by GDAL and are short values representing meters above sea level for each sample it should work.
Here are some links to data sets online that you can use as input for AltusTerrain:
As you look at a data source, ensure you are satisfied that it meets your requirements. Some of the data that is in the public domain, for example, may not be accurate, or have holes. If you would like a accurate and commercially maintained set of height data there are several choices for that as well.
Step-By-Step Global Terrain Layer
- Visit Viewfinder Panoramas and download the 15 arc-second data set that they provide. It comes as a set of 25 zip files. Download and uncompress each file into a folder.
- Generate a VRT from the terrain data using this command:
gdalbuildvrt terrain15.vrt *.tif
- Next, create a source of water data. You can do this by downloading the Natural Earth shape files and burning them to a GeoTIFF. Those steps are outlined above.
- Now run AltusTerrain to create a set of terrain tiles. You can use a command like this:
AltusTerrain -i terrain15.vrt \
    -wi water15.tif \
    -of terrain_tiles \
    -png \
    -ml 5 \
    -fa bilinear \
    -imh
This command will:
- Generate terrain tiles from terrain.vrt to level pseudo-mercator level 5
- Use water data from water.tif to encode water information
- Store the tiles in 16-bit grayscale PNG format
- Use bilinear filtering for down-sampling
- Ignore max height values.
NOTE: The -ihm flag is for data sets that do not require propagating the maximum height in a given sample up the LOD chain. If your application uses height profiling and you need the most accurate information, do not use this flag. Otherwise, you can use this flag to speed up data processing.
- You can package up these files as an Altus map package using this command:
AltusPackage -o MyTerrain.sqlite \
    -pt terrain_png
    -if terrain_files
This package can be used in offline scenarios.
- You can also place the entire folder on a web server and serve them up to Altus as a streamable terrain layer.
Once you understand the process you can explore creating higher detail terrain data sets, or sets that mix-and-match different detail levels in the same data set.
For Advanced Users
You can speed up processing in several ways:
- Create down-sampled terrain and water data sets using a command like this for terrain:
gdal_translate -outsize 25% 25% \
    -of GTiff \
    terrain15.vrt \
    terrrain15_25.tif
Or this for water imagery:
gdal_translate -outsize 25% 25% \
    -of GTiff \
    -b 1 \
    -co "NBITS=1" \
    -co "COMPRESS=CCITTFAX4" \
    water15.tif \
    water15_25.tif
This will make a data-set for each that is 25% of the original size. These can be used for the lower levels. You could then have a bash script that looks something like this:
#!/bin/bash
set -u
set -e
#Generate to level 5 using 1/4 sized 15-arc second data
AltusTerrain -i terrain15_25.tif \
    -wi water15_25.tif \
    -of tiles \
    -ihm \
    -fa bilinear \
    -ml 5 \
    -png
#Generate to level 9 using 15-arc second
AltusTerrain -i terrain15.vrt \
    -wi water15.tif \
    -of tiles \
    -ihm \
    -fa bilinear \
    -ml 9 \
    -png
Here is a even more advanced script that mixes several different data sets and creates world-wide data set with the continental United States at a higher level of detail.
- 15 arc-second data down-sampled to 25% size using gdal_translate
- 15 arc-second full resolution data
- 3 arc-second full resolution data
#!/bin/bash
set -u
set -e
#Generate to level 4 using 1/4 sized 15-arc second data
AltusTerrain \
    -i terrain15_25.tif \
    -wi water_50m_21600x10800.tif \
    -of tiles \
    -imh \
    -fa bilinear \
    -ml 5 \
    -png
#Generate to level 9 using 15-arc second
AltusTerrain \
    -i terrain15.vrt \
    -wi water_50m_86401x43201.tif \
    -of tiles \
    -imh \
    -fa bilinear \
    -ml 9 \
    -png \
    -us_bounds
#Generate to level 10 using 3-arc second
AltusTerrain \
    -i terrain3.vrt \
    -wi water_10m_us_86401x43201.tif \
    -of tiles \
    -imh \
    -fa bilinear \
    -ml 10 \
    -png \
    -us_bounds